Showing posts with label Pocket development. Show all posts

Friday, January 14, 2011

Controls for windows mobile 6.x

This is a list of some available controls for windows mobile 6.x

Fluid – Windows Mobile 6.x Touch Controls
Fluid is a .NET 2.0 control library for Windows Mobile 6.0/6.1 with touch controls.
Price
Free, open source.
Image
Code example
private void Form1_Load(object sender, EventArgs e)
{
    //Main Panel
    FluidPanel mainPanel = new FluidPanel();
    mainPanel.Bounds = new Rectangle(0, 0, 240, 300);
    mainPanel.BackColor = Color.Red;
    mainPanel.GradientFill = true;
    mainPanel.GradientFillOffset = 30;
    mainPanel.ForeColor = Color.White;
    mainPanel.ShowMaximized();
    fluidHost1.Add(mainPanel);

    //Label
    FluidLabel h1 = new FluidLabel("Fluid サンプル", 0, 0, 240, 40);
    h1.ShadowColor = Color.Black;
    h1.ForeColor = Color.White;
    h1.Alignment = StringAlignment.Center;
    h1.LineAlignment = StringAlignment.Center;
    h1.Font = new Font(FontFamily.GenericSansSerif, 12f, FontStyle.Bold);
    h1.Anchor = FluidControl.AnchorTLR;
    fluidHost1.Add(h1);

    //
    FluidButton okBtn = new FluidButton("OK", 70, 200 - 40, 100, 32);
    okBtn.BackColor = Color.Black;
    //okBtn.Click += new EventHandler(okBtn_Click);
    okBtn.ForeColor = Color.White;
    okBtn.Anchor = FluidControl.AnchorBL;
    fluidHost1.Add(okBtn);
}


Home site
http://fluid.codeplex.com/


Windows Mobile Password Safe
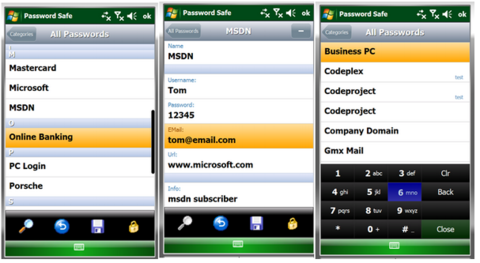
Password Safe is a .NET 2.0 Mobile application that allows you to keep your passwords in your mobile secured with the top secure AES encryption. It provides a nice touch surface with gestures, and can be completely used without a stylus, except when you're writing or editing new passwords.
Price
Free, open source
Image

Code example
void delPasswordButton_Click(object sender, EventArgs e)
{
    passwordToRemove = passwordsListBox.SelectedPassword;
    if (passwordToRemove != null)
    {
        MessageDialog dialog = new MessageDialog();
        dialog.Message = "Delete Password?";
        dialog.Result += new EventHandler(dialog_Result);
        dialog.ShowModal(ShowTransition.FromBottom); 
    }
} 

void dialog_Result(object sender, Fluid.Classes.DialogEventArgs e)
{
    switch (e.Result)
    {
        case System.Windows.Forms.DialogResult.OK:
            ListBuilder.Instance.DeletePassword(passwordToRemove);
            UpdatePasswords();
            this.GoBack();
            break;
    }
} 

Home site
http://www.codeproject.com/KB/windows/MobilePasswordSafe.aspx


Touch Controls Suite 2
Touch Controls Suite 2 is the leading touch UI component suite that allows software developers to create graphically stunning, highly intuitive touch screen user interfaces for Windows Mobile Smartphone applications that are based on the Microsoft .NET Compact Framework (.NETCF).
Price
$99.00
Image
Source example
private void loadList(AnimationDirection ad, AnimationType at)
        {
            //XmlNodeList lName = root.GetElementsByTagName("name");
            //XmlNodeList lDesc = root.GetElementsByTagName("desc");
            //TreeNode RootNode = new TreeNode();

            touchListBox1.PrepareAnimation();
            touchListBox1.Items.Clear();
            touchListBox1.BackColor = System.Drawing.SystemColors.InactiveCaption; //System.Drawing.SystemColors.ControlDark;

            //for (int i = 0; i < lName.Count; i++)
            for (int i = 0; i < root.ChildNodes.Count; i++ )
            {
                TouchListDefaultItem di = getItemList(root.ChildNodes[i]["name"].InnerText, root.ChildNodes[i]["desc"].InnerText, i);
                touchListBox1.Items.Add(di);

                TouchListHeaderItem hi = getItemSpacer();
                touchListBox1.Items.Add(hi);
            }

            //animationType = AnimationType.atSlide;

            //touchListBox1.Refresh();
            touchListBox1.UpdateList();  // (AnimationDirection.adLeft);  //(false); //(ad, at, false);
        }
Home site
http://www.mirabyte.com/en/products/touch-controls-suite/

Smart Device Framework
The Smart Device Framework is aimed at developers wanting to simplify and reduce the cost of their development experience using the .NET Compact Framework. By providing useful extensions the core .NET Compact Framework class libraries, the Smart Device Framework enables developers to concentrate on building core application functionality.
Price
Free / $50 / $500
Image
Home site
http://opennetcf.com/CompactFramework/Products/SmartDeviceFramework/tabid/65/Default.aspx

Thursday, August 19, 2010

How to detect screen rotation on windows mobile

You need to add the next references:

Microsoft.WindowsMobile
Microsoft.WindowsMobile.Status


Add the next code to your form load:

Microsoft.WindowsMobile.Status.SystemState MyScreenOrientationMonitor = new Microsoft.WindowsMobile.Status.SystemState(Microsoft.WindowsMobile.Status.SystemProperty.DisplayRotation);

MyScreenOrientationMonitor.Changed += new Microsoft.WindowsMobile.Status.ChangeEventHandler(ScreenRotatingDetector_Changed);


Finally add the specified event handler that fires when the screen has changed:

void ScreenRotatingDetector_Changed(object sender, Microsoft.WindowsMobile.Status.ChangeEventArgs args)
{
//Send a message to the screen
MessageBox.Show("Rootating......");
}

Thursday, July 22, 2010

Setup Installer For Windows Mobile Applications

SETUP INSTALLER FOR WINDOWS MOBILE APPLICATIONS

The creation of an installer with Visual Studio is simple, requires little coding, and can be done within the existing Visual Studio Solution for your application, this is the path we need to follow:

1. Create a windows mobile application

2. Create a CAB installation file

3. Create a custom action for the installation

4. Create a windows installer setup application

In this tutorial we are going to focus on steps 3 and 4.

I. CREATING A WINDOWS MOBILE APPLICATION

1. On visual studio select: New Project >>Smart Device>>Device Application

2. Add some components to your form

3. Compile the project

II.CREATING A CAB INSTALLATION FILE

Add a new CAB project by right click the solution and select:

Add >> New Project >> Other Project Types >> Setup and Deployment >> Smart Device CAB Project

Right click on the CAB installer project and select: Add >> Project Output


Select your mobile project then from the list select Primary output


Now to add the Programs Folders on the CAB project, on the File System on Target Machine right click it then click on: Add Special Folder>> Programs Folder


Select Programs Folder on the File System tree, then right click on the empty panel at right and select Create New Shortcut


Select Application Folder >> Primary output, then click ok


Now it is time to add a registry key. Click on the Registry Editor button


          And add the string value "HKLM\Software\My Company\My App\Version"
          

You need to create the path key by key, and then add the string value on the right panel.


Name it "Version" and then, select it, and enter "1.0" into the Value field on the Properties Window


Build your project and you will have the CAB file by now.


III.CREATING A CUSTOM ACTION

1. On the File menu, point to Add, and then click New Project. Name the new project MyCustomAction.

2. On the Project menu, click Add New Item. In the template list, click Installer Class. Name the new class MyInstallerClass.

3. In the Solution Explorer pane, right-click MyInstallerClass.cs, and then click View Code.

4. In the code window, create a new method called Commit. This method overrides the Commit method of the base Installer class. Use this method to invoke the application manager. The following code example shows the implementation of Commit.


public override void Commit(System.Collections.IDictionary savedState)
{
// Call the Commit method of the base class
base.Commit(savedState);

// Open the registry key containing the path to the Application Manager
Microsoft.Win32.RegistryKey key = null;
key = Microsoft.Win32.Registry.LocalMachine.OpenSubKey("Software\\microsoft\\windows\\currentversion\\app paths\\ceappmgr.exe");

// If the key is not null, then ActiveSync is installed on the user's desktop computer
if (key != null)
{
// Get the path to the Application Manager from the registry value
string appPath = null;
appPath = key.GetValue(null).ToString();

// Get the target directory where the .ini file is installed.
// This is sent from the Setup application
string strIniFilePath = "\"" + Context.Parameters["InstallDirectory"] + "myApp.ini\"";
if (appPath != null)
{
// Now launch the Application Manager
System.Diagnostics.Process process = new System.Diagnostics.Process();
process.StartInfo.FileName = appPath;
process.StartInfo.Arguments = strIniFilePath;
process.Start();
}
}
else
{
// No Active Sync - throw a message
}
}


Now you need to add an .ini file

Create a text file in notepad save it as setup.ini and put the next code:


[ceAppManager]
Version = 1.0
Component = SampleApp

[SampleApp]
Description = Sample Application
Uninstall = Pocket App
CabFiles = YourCab.cab


IV. CREATE A WINDOWS INSTALLER SETUP APPLICATION

  1. On the File menu, point to Add, and then click New Project. In the Project Types tree structure, expand the Other Project Types node. In the Templates pane, click Setup Project. Name the project MyAppSetup.
  2. Right-click on the newly created project in Solution Explorer, point to View, and then select File System. The File System window allows you to control where files are installed on the user's computer. For this example, the files are the .cab and .ini files that the Application Manager will use to install the application on the Windows Mobile device.
  3. To add your application's .cab file, right-click on the Application Folder icon, point to Add, and then click Project Output. In the Project list in the Add Project to Output Group window, select MyAppCab, click Built Outputs, and then click OK.
  4. To add the .ini file for your application, right-click Application Folder icon, point to Add, and then click File. Browse to your .ini file, and then click OK.
  5. Right-click the MyAppSetup project icon in Solution Explorer, point to View, and then click Custom Actions. The Custom Actions window allows you to assign custom actions to be executed for different events in the installation.
  6. In the Custom Actions window, right-click the Install icon, and then click Add Custom Action.
  7. In the Select Item in Project window, click on Application Folder, and then click OK. Click the Add Output button. From the Project list in the Add Project to Output Group window, click MyAppCustomAction, click Primary Output, and then click OK twice. For the commit custom action, repeat steps 6 and 7.
  8. In the Custom Actions window, click Primary Output from MyAppCustomAction in the Commit folder area. In the Properties window, enter the following value for the CustomActionData property: /targetdir="[TARGETDIR]\" this passes the directory in which the .cab and .ini files for your application are installed to the custom action.

Compile your project and execute the .exe file created!


Sources:

http://msdn.microsoft.com/en-us/library/bb158529.aspx

http://www.devx.com/wireless/Article/31198/1954

http://www.mobilepractices.com/2008/02/how-to-create-windows-mobile-smart.html

http://www.devx.com/wireless/Article/31198/1954


Tuesday, May 18, 2010

Macro strings in file registry settings


When we hard code some paths for a CAB file we can have some problems if the user is installing in the application on an external memory or if it is installed on a different language.
To avoid this problem we can use Macro Strings.
They way these macro strings work is that if you specify a registry value like %InstallDir% the CAB installation process will replace the %InstallDir% part of your string with the device’s specified installation directory.

This is a list of some of the string macros on English devices:


%InstallDir% [directory application installed into]
%AppName% [name of application]
%CE1% \Program Files
%CE2% \Windows
%CE4% \Windows\StartUp
%CE5% \My Documents
%CE8% \Program Files\Games
%CE11% \Windows\Start Menu\Programs
%CE14% \Windows\Start Menu\Programs\Games
%CE15% \Windows\Fonts
%CE17% \Windows\Start Menu

Shortcuts in windows mobile


When you create a shortcut on windows mobile, it will be showed up in different parts depending on the folder where you paste it, these are some folders:
\Windows\StartUp
shortcuts to applications placed in this directory will automatically be started whenever the Windows Mobile device is reset.

\Windows\Start Menu
shortcuts placed in this directory will appear in the Windows start menu.

\Windows\Start Menu\Settings
Shortcuts placed in this folder will appear on the System tab of the Settings application that is accessible via the Start Menu.


Tuesday, April 27, 2010

How to created a shortcut on Pocket PC


Some programs don't create a shortcut on the Pocket Pc, at the same time we don't have a quick option to create on inside of the Pocket PC, here we have a couple ways to create a shortcut on the device.


You need to synchronize your Pocket PC, when is ready, Go to My Computer on your desktop and click Mobile Device. Navigate to the program for which you want to create the shortcut.
Right-click the program and select Create Shortcut. Right-click the shortcut and select Cut. Go to the \Windows\Start Menu\ folder under Mobile Device on your desktop, right-click inside the folder, and select Paste to paste the shortcut into the Pocket PC's Start menu.


You can use a small application provided by Scott & Ce Appt. named "NewShortcut" to create shortcuts without the need for ActiveSync, you can get it from the next link:


http://www.scottandmichelle.net/scott/cestuff.html