On this article you are going to see the steps needed to access you machine remotely without paying extra money for static ip and domain.
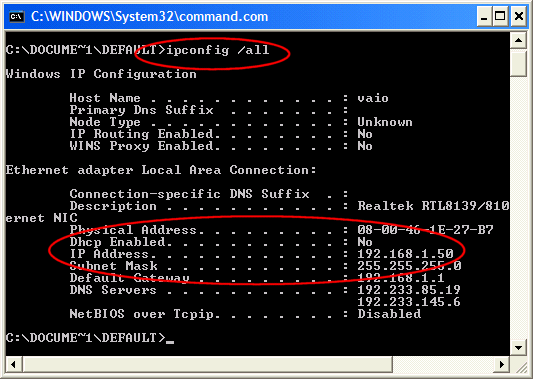
Got to Start >> Select Run >> Type: command >> click OK.
Type: ipconfig /all >> press Enter.
Look for these values:
- Dhcp Enabled
- IP Address (This is your current IP address)

Leave this window open to use the values later.
Open Control Panel >> Open Network Connections
Category view: Select Network and Internet Connections >> Network Connections.
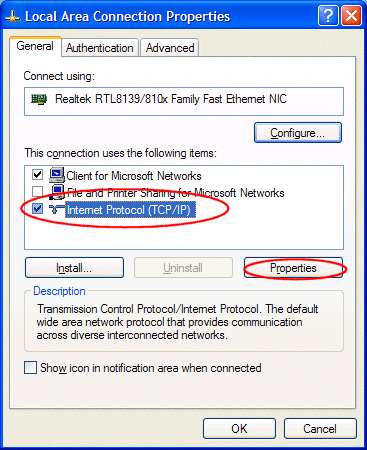
Double-click on your active LAN or Internet connection >> Properties.
In the General tab, select the Internet Protocol (TCP/IP) item >> click Properties.

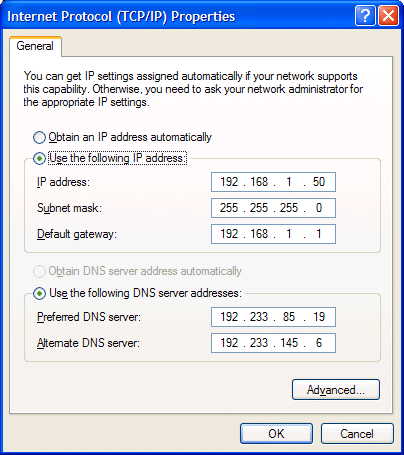
In the General tab, click Use the following IP address, and enter:
- IP address. The static IP address you want to assign to this computer.
- Subnet mask. Subnet mask used by your router.
- Default gateway. IP address of your router's default gateway.

Click OK to close each window >>
Restart your computer (if needed)
Now your computer is going to use always the internal static IP (in this example 192.168.1.50)
Source: http://www.hotcomm.com/faq/FAQ_staticIPXP.asp
2.- Create a DNS account
Enter your email address and password >> click the Create Account button.
Once you activate the account, login to the website and follow these steps.
Account >> My Services >> Add Host Services >> Dynamic DNS
Once you activate the account, login to the website and follow these steps.
Account >> My Services >> Add Host Services >> Dynamic DNS
Click on Add a New Host
Enter a hostname, it can be anything like “MyHomePc”. Hit Add Host.
Source: http://technopedia.info/tech/2006/05/09/remote-desktop-for-dummies.html
3.- Enable remote desktop
Right click on My Computer
Select Properties >> click on the Remote tab
Check the box that says Allow users to connect remotely to this computer.
Now set up the firewall
Go to Control panel >> Windows Firewall
Click on Exceptions >> Click Add Program
Select Remote desktop >> Click Ok
4.- Setup router
Look for your router in the next web site http://portforward.com this example is for Netgear WGR614v6.
Open a web browser, enter the ip address of your router in the address bar of your browser. By default the ip address should be set to 192.168.1.1.

Click the Port Forwarding / Port Triggering link near the left of the page.

Put a dot into the Port Forwarding radio button. Click the Add Custom Service button.


We will list a series of lines here that will show you exactly how to forward the ports you need to forward. Remote Desktop requires you to forward the 3389 ports. Go ahead and enter the settings shown above into the Custom Services menu and then click Apply.
Source: http://portforward.com
Now you are ready to access your machine remotely without spending extra money!

Awesome workaround and very clear instructions. Thanks for this!
ReplyDelete