Wednesday, December 22, 2010

Sony DVD Architect Studio 3.0 Prepare Folder Error

If you are unable to create the DVD in Sony Architect Studio 3.0 and you get the error:
'The selected folder is not valid. It is either not possible to create the folder or you do not have write access.'

Looks like you are using Windows Vista or Windows 7.

To solve the problem:
  • Rigth click on the short cut of Sony Architect
  • From the menu select "Run as administrator"
  • Try to make the movie again
  • You should be now able to create the DVD in the specified folder

Tuesday, December 21, 2010

How to create a GUID in C#

GUID (Globally unique identifier) is a 128-bit integer that can be used to uniquely identify something.
You may store users or products in your database and you want somehow uniquely identify each row in the database.
A common approach is to create a autoincrementing integer, another way would be to create a GUID for your products.
The GUID method can be found in the System namespace. The GUID method System.Guid.NewGuid() initializes a new instance of the GUID class.


Response.Write(@"
System.Guid.NewGuid().ToString() = " + System.Guid.NewGuid().ToString());


Response.Write(@"
System.Guid.NewGuid().ToString(""N"") = " + System.Guid.NewGuid().ToString("N"));

Response.Write(@"
System.Guid.NewGuid().ToString(""D"") = " + System.Guid.NewGuid().ToString("D"));

Response.Write(@"
System.Guid.NewGuid().ToString(""B"") = " + System.Guid.NewGuid().ToString("B"));

Response.Write(@"
System.Guid.NewGuid().ToString(""P"") = " + System.Guid.NewGuid().ToString("P"));

Monday, December 20, 2010

The connection [ip] requires the use of the SonicWALL Adapter, error

If you get the error when using SonicWALL VPN:
The connection "ip address" requires the use of the SonicWALL Adapter, however this adapter can not be found. Itmay have been disabled or uninstalled. Please check your network configuration."

This is What you need to do in order to fix it:
  •  Control Panel >> Network Connections
  • Right click on SonicWALL Virtual Adapter
  • Select Enable
  • Try to connect again, you should be able to connect now

Friday, December 17, 2010

Programmatically opening a file in its native program

OpenFileDialog ofd = new OpenFileDialog();


if (ofd.ShowDialog() == DialogResult.OK)

                  System.Diagnostics.Process.Start(ofd.FileName);

Thursday, December 16, 2010

How to disable Utility Manager (Windows Key + U)

Pressing the Windows key with U starts the Utility Manager, which provides a number of useful aids (e.g., the Narrator, magnifier, on-screen keyboard) for people who have poor vision. 


To disable this shortcut, perform one of the following options: 


Option 1
1.Start the Microsoft Management Console (MMC) Services snap-in (Start, Programs, Administrative Tools, Services). 
2.Right-click Utility Manager, and select Properties. 
3.Set the Start-up type to Disabled, and click Apply. Then click OK. 


Option 2
Under C:\Windows\System32 you can rename utilman.exe to disable it.

Option 3
If renaming the utility doesn't work, try deleting the util & replacing it with a null file, [cmd window]:
Del utilman.exe 
COPY nul utilman.exe 
Attr utilman.exe +R

Monday, November 29, 2010

The current time on this computer and the current time on the network are different

If you get the next error when trying to log on to your machine:
The current time on this computer and the current time on the network are different. For more information about Date/Time Properties, see Help and Support. To log on, contact your system administrator.

This is what you can do to fix it.

  1. Log on to the local machine using an account with administrator's rights
  2. Go to Start>>Run
  3. On the Open box type cmd (the command window should show up)
  4. Type:     net time \\YourServername /set /y      
  5. Another option could be:      net time /domain:YourDomainName /set /y   
  6. Then press enter
  7. Log Off
  8. Now you are able to log on on the domain
If you logged on with an account without admin rights you will get the next error:
System error 5 has occurred, access denied


The computer should update the date and time automatically - especially if you joined the PC to the domain via the //connect site, if you keep getting this error it may be a sympton of a bigger problem

Wednesday, November 24, 2010

VLOOKUP in Microsoft Excel

If you need to translate a column value to another sheet vlookup is the function that will do the job.
In the next example I have one sheet with names and country codes, I need to show in this sheet instead of the country code the name of the country that is in another sheet.

This is my User sheet:

This is my Country codes sheet, The ID column (Country Code) has to be first:


To do the job follow the next steps:
Click on the User >> C2 field, this is the column where we are going to insert the country names
From the Excel Ribbon select Lookup & Reference >> VLOOKUP, a formula window will be showed
For the "Lookup_value" click on the field value that is going to join both sheets, in this case click on Country Code >> 1

For the "Table_Array" value, we need to select from the country reference sheet all the values where we are going to find the values, in this case I selected all the Country Code and Name columns

For the "Col_index_num" we need to indicate the column number of the information we need, in this case is column two from the Country sheet

To finish with this formula window we indicate the "Range_Lookup" there are two possible vales:

  • FALSE if you need an exact match
  • TRUE to find the closest match


Now press "OK" the window will be closed and you will have your formula as showed below:

If you copy ans paste the formula like this in the rest of the cells it will show the same value, to fix this and get the right value you need to modify the formula a little bit.
To fix the current formula:
                                       =VLOOKUP(B3,Country!A1:B4,2,FALSE)
Add the $ before the range of the "Table_Array" value, as showed below:
                                      =VLOOKUP(B3,Country!A$1:B$4,2,FALSE)

Now you can copy the formula in the rest of the fields, the result is showed below:

Friday, October 22, 2010

How to copy files larger than 4GB to an USB drive

Windows XP allows you to format a hard disk in two different file system formats: FAT32 and NTFS. These file systems differ in the size of file they can handle. FAT32, for example, can only handle files up to 4GB in size. When it was developed, that size file was almost unheard of but now, a DVD can have files that large or larger routinely.

If you need to copy files larger than 4GB, you need to make certain that the file system on the hard disk you are copying to is NTFS and not FAT32. Many portable USB hard disk drives come formatted as FAT32 in order to interface with the maximum number of operating systems.

To convert from FAT32 to NTFS on the command prompt window (Start | Run | type CMD and press Enter).
Then type the command CONVERT d: /FS:NTFS where d is the drive you want to convert.

You can also do it with the windows interface, watch the video below in order to learn how to do it:


Wednesday, September 22, 2010

Live Sync - How to map a drive letter to your network path


Map a drive letter to your network path
right click on the network folder, and select "Map Network Drive", I named it N:

In the Windows Live Sync website, find a shared folder, select "Add a computer", and
select your computer

Select your C: then a folder with a short name like C:\temp

In the website URL, rename "C" with your network drive letter
there are two places one after "bpath" and one after "blabel"

In the website URL, replace the folder name you selected with the folder name on your network path -- after "rpath"

Press ENTER or click on the GO button of the browser to show the new path in the screen

Now you can continue with folder setup as normal


Source:
http://connect.microsoft.com/LiveMesh/feedback/details/404603/sync-allow-network-folders-to-be-added-to-the-mesh


Debugging AJAX in VS


To debug Ajax you have to do it as the code is executing in the browser.
You write out a debug message using Sys.Debug.trace.
Your page must include the Microsoft AJAX Library JavaScript file. This is done by adding a ScriptManager control to your page.

The following code shows part of an .aspx page that includes a ScriptManager control and a JavaScript function named button1_onclick.
When this function is fired (from the user clicking button1), the trace method is called.


You can view the trace messages output by the AJAX library in the Visual Studio Output window.


Thursday, September 16, 2010

Auto-replay slides in power point (Indefinite Loop)


It is possible to loop a power point presentation until we press a key on the keyboard:
  1. Set up the animations on slide 1
  2. Give this slide an auto transition zero secs
  3. Create a custom show with just this slide (slide show >custom shows . new)
  4. Add an action button to hyperlink to "slide 2" (not next)
  5. In slide show > setup show choose 'loop till esc'
  6. Show Slides > custom show
  7. Play and click the action button to move on


Friday, September 10, 2010

A back button for ASP.NET pages


In order to implement a back button in ASP.NET we need to use Java Script history object and avoid the Post Back, the code below is the solution for this problem:


<asp:Button ID="button_history_back"
runat="server"
Text="Back"
CausesValidation="false"
OnClientClick="Javascript:history.go(-1); return false;"
/>


Thursday, September 2, 2010

Windows Installer is not included in any selected prerequisite


If you are working on a setup project and you get the warning:
Windows Installer is not included in any selected prerequisite

This means you need to add a prerequisite to you application, in order to fix it follow these steps in visual studio:

  1. In the solution explorer, right-click on your deployment project and select Properties;
  2. A window titled " Property Pages" should appear
  3. Click on the Prerequisites... button
  4. Select a package that installs Windows Installer 2.0
  5. Click OK button and re-build again.

This should remove the warning


Wednesday, September 1, 2010

Page Life Cycle Events in ASP.NET

EventDescription
PreInitThis is the first real event you might handle for a page. You typically
use this event only if you need to dynamically (from code) set
values such as master page or theme.
This event is also useful when you are working with dynamically
created controls for a page. You want to create the controls inside
this event.
InitThis event fires after each control has been initialized. You can use
this event to change initialization values for controls.
InitCompleteRaised once all initializations of the page and its controls have
been completed.
PreLoadThis event fires before view state has been loaded for the page
and its controls and before PostBack processing. This event is useful
when you need to write code after the page is initialized but
before the view state has been wired back up to the controls.
LoadThe page is stable at this time; it has been initialized and its state
has been reconstructed. Code inside the page load event typically
checks for PostBack and then sets control properties appropriately.
The page’s load event is called first. Then, the load event for each
child control is called in turn (and their child controls, if any). This
is important to know if you are writing your own user or custom
controls.
Control (PostBack) event(s)ASP.NET now calls any events on the page or its controls thatcaused the PostBack to occur. This might be a button’s click event,for example.
LoadCompleteAt this point all controls are loaded. If you need to do additional
processing at this time you can do so here.
PreRenderAllows final changes to the page or its control. This event takes place after all regular PostBack events have taken place. This event takes place before saving ViewState, so any changes made here are saved.
SaveStateCompletePrior to this event the view state for the page and its controls is set. Any changes to the page’s controls at this point or beyond are ignored. This is useful if you need to write processing that requires the view state to be set.
RenderThe Render method generates the client-side HTML, Dynamic Hypertext Markup Language (DHTML), and script that are necessary to properly display a control at the browser. This method is useful if you are writing your own custom control. You override this method to control output for the control.
UnLoadThis event is used for cleanup code. You use it to release any managed resources in this stage. Managed resources are resources that are handled by the runtime, such as instances of classes created by the .NET common language runtime.

Tuesday, August 31, 2010

Format System.DateTime in .NET


System.DateTime in ASP.NET


Below are common uses of the DateTime Structure in C#


DateTime.Now; 8/31/2010 12:25:09 PM
DateTime.Now.ToString(); 8/31/2010 12:25:09 PM
DateTime.Now.ToShortTimeString()12:25 PM
DateTime.Now.ToShortDateString()8/31/2010
DateTime.Now.ToLongTimeString()12:25:09 PM
DateTime.Now.ToLongDateString()Tuesday, August 31, 2010


DateTime.Now.ToString("d")8/31/2010
DateTime.Now.ToString("D")Tuesday, August 31, 2010
DateTime.Now.ToString("f")Tuesday, August 31, 2010 12:25 PM
DateTime.Now.ToString("F")Tuesday, August 31, 2010 12:25:09 PM
DateTime.Now.ToString("g")8/31/2010 12:25 PM
DateTime.Now.ToString("G")8/31/2010 12:25:09 PM
DateTime.Now.ToString("m")August 31
DateTime.Now.ToString("r")Tue, 31 Aug 2010 12:25:09 GMT
DateTime.Now.ToString("s")2010-08-31T12:25:09
DateTime.Now.ToString("t")12:25 PM
DateTime.Now.ToString("T")12:25:09 PM
DateTime.Now.ToString("u")2010-08-31 12:25:09Z
DateTime.Now.ToString("U")Tuesday, August 31, 2010 5:25:09 PM
DateTime.Now.ToString("y")August, 2010
DateTime.Now.ToString("dddd, MMMM dd yyyy")Tuesday, August 31 2010
DateTime.Now.ToString("ddd, MMM d "'"yy")Tue, Aug 31 '10
DateTime.Now.ToString("dddd, MMMM dd")Tuesday, August 31
DateTime.Now.ToString("M/yy")8/10
DateTime.Now.ToString("dd-MM-yy")31-08-10


Source: http://www.csharpfriends.com/demos/system.datetime.aspx


Special folders in a VS web site

Special folders in a VS web site.

Special folders can be added to a Web site from the Visual Studio menu system. Typically
this involves right-clicking the Web application project and selecting Add ASP.NET Folder.

Folder NameDescription
App_BrowsersContains browser definition files (.browser) that ASP.NET uses
to identify browsers and determine their capabilities. These
files are often used to help support mobile applications.
App_CodeContains source code for classes and business objects (.cs,
.vb, and .jsl files) that you want to compile as part of your
application
App_DataContains application data files (.mdf and .xml files)
App_GlobalResourcesContains resources (.resx and .resources files) that are compiled
into assemblies and have a global scope. Resource files
are used to externalize text and images from your application
code. This helps you support multiple languages and
design-time changes without recompilation of source code
App_LocalResourcesContains resources (.resx and .resources files) that are
scoped to a specific page, user control, or master page in an
application.
App_ThemesContains subfolders that each define a specific theme (or
look) for your site. A theme consists of files (such as .skin,
.css, and image files) that define the appearance of Web
pages and controls.
App_WebReferencesContains Web reference files (.wsdl, .xsd, .disco, and .discomap
files) that define references to Web services
BinContains compiled assemblies (.dll files) for code that you
want to reference in your application. Assemblies in the Bin
folder are automatically referenced in your application


Wednesday, August 25, 2010

How to use mySQL with .Net

Add mySQL connector
In order to use mySQL with .Net you need to download the connector from the next web site:

http://dev.mysql.com/downloads/connector/net/


Add mySQL connector to your project
On your project right click on "References" ans select "Add Reference..."
Browse to the folder where you installed the connector and open the folder "Assemblies"
Add the MySql dlls

Use connector en your code
Now you can use the connector in your code to access mySQL database


using System;
using System.Configuration;
using System.Data.SqlClient;
using System.Data;
using MySql.Data;
using MySql.Data.MySqlClient;

namespace mySQLExample
{
///
/// Summary description for dbConnection.
///

public class dbConnection
{
private string connectionString;

public dbConnection()
{
connectionString = "Server=MySqlServer;Database=MySqlDB;Uid=MySqlUser;Pwd=MySQLPsw;Port=3306;old guids=true";
}


public DataSet ExecuteQuery(CommandType cmdType, string cmdText, params System.Data.Common.DbParameter[] cmdParms)
{
using (MySqlConnection conn = new MySqlConnection(connectionString))
{
using (MySqlCommand cmd = new MySqlCommand())
{
PrepareCommand(cmd, conn, null, cmdType, cmdText, cmdParms);
using (MySqlDataAdapter da = new MySqlDataAdapter(cmd))
{
DataSet ds = new DataSet();
da.Fill(ds, "dataset");
cmd.Parameters.Clear();
return ds;
}
}
}
}

public int ExecuteNonQuery(CommandType cmdType, string cmdText, params System.Data.Common.DbParameter[] cmdParms)
{
MySqlCommand cmd = new MySqlCommand();

using (MySqlConnection conn = new MySqlConnection(connectionString))
{
PrepareCommand(cmd, conn, null, cmdType, cmdText, cmdParms);
int val = cmd.ExecuteNonQuery();
cmd.Parameters.Clear();
return val;
}
}

private static void PrepareCommand(System.Data.Common.DbCommand cmd, System.Data.Common.DbConnection conn, System.Data.Common.DbTransaction trans, CommandType cmdType, string cmdText, System.Data.Common.DbParameter[] cmdParms)
{
if (conn.State != ConnectionState.Open) conn.Open();

cmd.Connection = conn;
cmd.CommandText = cmdText.Replace("@", "?").Replace(":", "?");

if (trans != null) cmd.Transaction = trans;

cmd.CommandType = cmdType;

if (cmdParms != null)
{
foreach (MySqlParameter parm in cmdParms)
{
parm.ParameterName = parm.ParameterName.Replace("@", "?").Replace(":", "?");
cmd.Parameters.Add(parm);
}
}
}

}
}


C# and mySQL error: Guid should contain 32 digits with 4 dashes (xxxxxxxx-xxxx-xxxx-xxxx-xxxxxxxxxxxx)


Problem:
When working with C# and mySQL, I use the code below I get the error message "Guid should contain 32 digits with 4 dashes (xxxxxxxx-xxxx-xxxx-xxxx-xxxxxxxxxxxx)"


       public DataSet ExecuteQuery(System.Data.Common.DbTransaction trans, CommandType cmdType, string cmdText,
           params System.Data.Common.DbParameter[] cmdParms)
       {
           MySqlCommand cmd = new MySqlCommand();

           PrepareCommand(cmd, trans.Connection, trans, cmdType, cmdText, cmdParms);

           MySqlDataAdapter da = new MySqlDataAdapter(cmd);

           DataSet ds = new DataSet();

           da.Fill(ds, "ds");

           cmd.Parameters.Clear();

           return ds;
       }


Cause:
The problem is that the the guids are being returned as varbinary(16) instead of binary(16) and as a result nhibernate throws an error.

Solution:
After version 6.1.1 you should add "old guids=true" to your connection string whenever you use BINARY(16) as your storage type. Else you should use CHAR(36)


Tuesday, August 24, 2010

How to insert a new line in a TextBox


To insert a new line in a TextBox, first make sure you have the MultiLine property of the TextBox set to True.
Do not try to use \r\n (carriage return and new line) because is not going to work, instead you must use:

Environment.Newline

Example:
TextBox1.Text = "First line" + + Environment.NewLine + "Second line";


This is working since C# 1.1

Thursday, August 19, 2010

How to detect screen rotation on windows mobile

You need to add the next references:

Microsoft.WindowsMobile
Microsoft.WindowsMobile.Status


Add the next code to your form load:

Microsoft.WindowsMobile.Status.SystemState MyScreenOrientationMonitor = new Microsoft.WindowsMobile.Status.SystemState(Microsoft.WindowsMobile.Status.SystemProperty.DisplayRotation);

MyScreenOrientationMonitor.Changed += new Microsoft.WindowsMobile.Status.ChangeEventHandler(ScreenRotatingDetector_Changed);


Finally add the specified event handler that fires when the screen has changed:

void ScreenRotatingDetector_Changed(object sender, Microsoft.WindowsMobile.Status.ChangeEventArgs args)
{
//Send a message to the screen
MessageBox.Show("Rootating......");
}

Friday, August 6, 2010

Change default language in Visual Studio


  1. Tools
  2. Import export settings wizard


  3. Reset all settings


  4. No, just reset settings, overwriting my current settings
  5. Select the default collection of settings (C#, VB, etc.)
  6. Finish


Thursday, August 5, 2010

Get the name of the day from a number


int dayName = 5;
string NameOfDay =
System.Globalization.DateTimeFormatInfo.CurrentInf o.GetDayName((DayOfWeek)
dayName);


String Format for DateTime in C#

Following examples demonstrate how are the format specifiers rewritten to the output.
// create date time 2008-03-09 16:05:07.123
DateTime dt = DateTime.Now;

String.Format("{0:y yy yyy yyyy}", dt);  // "8 08 008 2008"   year
String.Format("{0:M MM MMM MMMM}", dt);  // "3 03 Mar March"  month
String.Format("{0:d dd ddd dddd}", dt);  // "9 09 Sun Sunday" day
String.Format("{0:h hh H HH}",     dt);  // "4 04 16 16"      hour 12/24
String.Format("{0:m mm}",          dt);  // "5 05"            minute
String.Format("{0:s ss}",          dt);  // "7 07"            second
String.Format("{0:f ff fff ffff}", dt);  // "1 12 123 1230"   sec.fraction
String.Format("{0:F FF FFF FFFF}", dt);  // "1 12 123 123"    without zeroes
String.Format("{0:t tt}",          dt);  // "P PM"            A.M. or P.M.
String.Format("{0:z zz zzz}",      dt);  // "-6 -06 -06:00"   time zone

// ***********************************************************************
// custom date and time formatting:

// month/day numbers without/with leading zeroes
String.Format("{0:M/d/yyyy}", dt);            // "3/9/2008"
String.Format("{0:MM/dd/yyyy}", dt);          // "03/09/2008"

// day/month names
String.Format("{0:ddd, MMM d, yyyy}", dt);    // "Sun, Mar 9, 2008"
String.Format("{0:dddd, MMMM d, yyyy}", dt);  // "Sunday, March 9, 2008"

// two/four digit year
String.Format("{0:MM/dd/yy}", dt);            // "03/09/08"
String.Format("{0:MM/dd/yyyy}", dt);          // "03/09/2008"

String.Format("{0:t}", dt);  // "4:05 PM"                         ShortTime
String.Format("{0:d}", dt);  // "3/9/2008"                        ShortDate
String.Format("{0:T}", dt);  // "4:05:07 PM"                      LongTime
String.Format("{0:D}", dt);  // "Sunday, March 09, 2008"          LongDate
String.Format("{0:f}", dt);  // "Sunday, March 09, 2008 4:05 PM"  LongDate+ShortTime
String.Format("{0:F}", dt);  // "Sunday, March 09, 2008 4:05:07 PM" FullDateTime
String.Format("{0:g}", dt);  // "3/9/2008 4:05 PM"                ShortDate+ShortTime
String.Format("{0:G}", dt);  // "3/9/2008 4:05:07 PM"             ShortDate+LongTime
String.Format("{0:m}", dt);  // "March 09"                        MonthDay
String.Format("{0:y}", dt);  // "March, 2008"                     YearMonth
String.Format("{0:r}", dt);  // "Sun, 09 Mar 2008 16:05:07 GMT"   RFC1123
String.Format("{0:s}", dt);  // "2008-03-09T16:05:07"             SortableDateTime
String.Format("{0:u}", dt);  // "2008-03-09 16:05:07Z"            UniversalSortableDateTime


Source:
http://www.csharp-examples.net/string-format-datetime/

Tuesday, August 3, 2010

Find the Most Time Consuming Code in SQL


To find the the Top 10 queries that take the most time run the query:
select top 10 source_code,stats.total_elapsed_time/1000000 as seconds,last_execution_time
from sys.dm_exec_query_stats as statscross
apply(SELECT text as source_code FROM sys.dm_exec_sql_text(sql_handle)) AS query_textorder by total_elapsed_time desc

To find the top 10 queries that take the maximum physical_reads run the query:
select top 10 source_code,stats.total_elapsed_time/1000000 as seconds,last_execution_time
from sys.dm_exec_query_stats as statscross
apply(SELECT text as source_code FROM sys.dm_exec_sql_text(sql_handle)) AS query_textorder by total_physical_reads desc


The method would work from version 2005 onwards. If you use it make sure the compatibility mode is set to 90.


How to change the compatibility mode in SQL


Maybe sometimes you get errors on a query you just found on the internet like:

Msg 102, Level 15, State 1, Line 1
Incorrect syntax near 'apply'.

The problem is that you are using functions from a different SQL version, you need to change the compatibility mode in SQL.
Changing the compatibility mode will not bring the server, or the database, down. The issues primarily have to do with what object names are valid, and what new commands are allowed. If dev is working fine with compatibility level 90, and you wont' be running any different code or accessing any different objects on Live, there should be no problems.

In addition, changing the compatibility mode doesn't change the database in anyway, so you can always revert back to compatibility level 80 if you want.

To change to compatibility mode use the next code:

ALTER DATABASE database_name SET COMPATIBILITY_LEVEL = { 80 | 90 | 100 }

or

EXEC sp_dbcmptlevel database_name, {80|90|100};

Version of SQL Server that can be reverted to can be one of the following:
60 = SQL Server 6.0
65 = SQL Server 6.5
70 = SQL Server 7.0
80 = SQL Server 2000
90 = SQL Server 2005
100 = SQL Server 2008


Monday, August 2, 2010

Auto align assignments on VS10

  1. Download "Productivity Power Tools" for VS10, from here, then install it.
  2. Select your code then press Ctrl+Alt+]
These are the results:
Before


After


Disable unique IDs on paste for Expression Web


If you want to disable the unique IDs on paste or when you modify your dwt in order to keep the correct reference to the style sheet, all you have to do is:
  1. Launch the "Page Editor Options" from the Tools menu option
  2. Uncheck the option "Make ID unique on paste"


Friday, July 30, 2010

How to load last known good configuration


To get the last known good configuration in Windows 2000/XP as it is booting press and hold your "F8 Key" which should bring up the "Windows Advanced Options Menu", some computers require than instead of press and hold the F8 key, type it continously until you get to the startup menu.
Now all you have to do is use your arrow keys to move to "Last Known Good Configuration" and press your Enter key.

Apache .htaccess file

.htaccess files (or "distributed configuration files") provide a way to make configuration changes on a per-directory basis. A file, containing one or more configuration directives, is placed in a particular document directory, and the directives apply to that directory, and all subdirectories thereof.

Default directory page

DirectoryIndex filename.html index.cgi index.pl default.htm


Protect access of .htaccess file


order allow,deny
deny from all


Customized error documents:

ErrorDocument 400 /errors/badrequest.html
ErrorDocument 401 /errors/authreqd.html
ErrorDocument 403 /errors/forbid.html
ErrorDocument 404 /errors/notfound.html
ErrorDocument 500 /errors/serverr.html


Blocking users by IP

order allow,deny
deny from 123.45.6.7
deny from 012.34.5.
allow from all


Redirects

Redirect /olddirectory/oldfile.html http://yoursite.com/newdirectory/newfile.html


Add MIME Types

AddType application/x-shockwave-flash swf


Protec againts hot linking of images and other file types

RewriteEngine on
RewriteCond %{HTTP_REFERER} !^$
RewriteCond %{HTTP_REFERER} !^http://(www\.)?mydomain.com/.*$ [NC]
RewriteRule \.(gif|jpg|js|css)$ - [F]


Preventing Directory Listing

IndexIgnore *
IndexIgnore *.bmp *.gif

Wednesday, July 28, 2010

How to restore archived items


Crete a new folder

In outlook create a new folder where you are going to restore the items from the archived file
  1. Got To Tools
  2. Account Settings
  3. Click on Data Files
  4. Click on New
  5. Select Outlook Personal Folder, then click OK
  6. Specify the physical name of the file and the location

Import the items

Now we will import the items from the archived to the new folder
1.- On the Go menu, click Folder List, and then in the Folder List, click the new folder.
2.- On the File menu, click Import and Export, Click Import from another program or file. Click Next


3.- Click Personal Folder File (.pst). Click Next
4.- In the File to import box, change the default file name in the path from backup.pst to the name of the archive file you're importing from. Click Next


5.- Click the folder to import from. If you want, click Include sub folders or specify the folder you are interesting on. Indicate how you want Outlook to handle duplicate items.


6.- Click Import items into the current folder.
7.- Click Finish.

The items now should be on your new folder.


Thursday, July 22, 2010

Setup Installer For Windows Mobile Applications

SETUP INSTALLER FOR WINDOWS MOBILE APPLICATIONS

The creation of an installer with Visual Studio is simple, requires little coding, and can be done within the existing Visual Studio Solution for your application, this is the path we need to follow:

1. Create a windows mobile application

2. Create a CAB installation file

3. Create a custom action for the installation

4. Create a windows installer setup application

In this tutorial we are going to focus on steps 3 and 4.

I. CREATING A WINDOWS MOBILE APPLICATION

1. On visual studio select: New Project >>Smart Device>>Device Application

2. Add some components to your form

3. Compile the project

II.CREATING A CAB INSTALLATION FILE

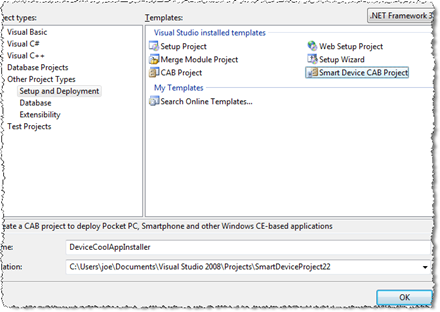
Add a new CAB project by right click the solution and select:

Add >> New Project >> Other Project Types >> Setup and Deployment >> Smart Device CAB Project

Right click on the CAB installer project and select: Add >> Project Output


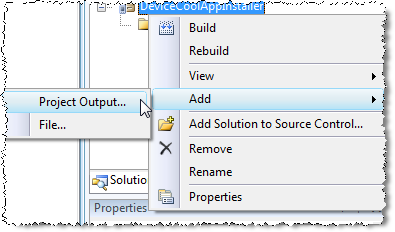
Select your mobile project then from the list select Primary output


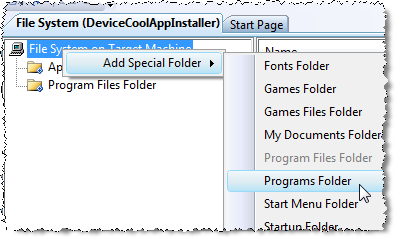
Now to add the Programs Folders on the CAB project, on the File System on Target Machine right click it then click on: Add Special Folder>> Programs Folder


Select Programs Folder on the File System tree, then right click on the empty panel at right and select Create New Shortcut


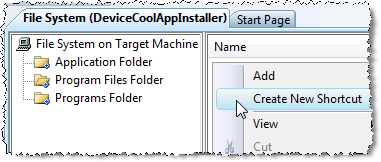
Select Application Folder >> Primary output, then click ok


Now it is time to add a registry key. Click on the Registry Editor button


          And add the string value "HKLM\Software\My Company\My App\Version"
          

You need to create the path key by key, and then add the string value on the right panel.


Name it "Version" and then, select it, and enter "1.0" into the Value field on the Properties Window


Build your project and you will have the CAB file by now.


III.CREATING A CUSTOM ACTION

1. On the File menu, point to Add, and then click New Project. Name the new project MyCustomAction.

2. On the Project menu, click Add New Item. In the template list, click Installer Class. Name the new class MyInstallerClass.

3. In the Solution Explorer pane, right-click MyInstallerClass.cs, and then click View Code.

4. In the code window, create a new method called Commit. This method overrides the Commit method of the base Installer class. Use this method to invoke the application manager. The following code example shows the implementation of Commit.


public override void Commit(System.Collections.IDictionary savedState)
{
// Call the Commit method of the base class
base.Commit(savedState);

// Open the registry key containing the path to the Application Manager
Microsoft.Win32.RegistryKey key = null;
key = Microsoft.Win32.Registry.LocalMachine.OpenSubKey("Software\\microsoft\\windows\\currentversion\\app paths\\ceappmgr.exe");

// If the key is not null, then ActiveSync is installed on the user's desktop computer
if (key != null)
{
// Get the path to the Application Manager from the registry value
string appPath = null;
appPath = key.GetValue(null).ToString();

// Get the target directory where the .ini file is installed.
// This is sent from the Setup application
string strIniFilePath = "\"" + Context.Parameters["InstallDirectory"] + "myApp.ini\"";
if (appPath != null)
{
// Now launch the Application Manager
System.Diagnostics.Process process = new System.Diagnostics.Process();
process.StartInfo.FileName = appPath;
process.StartInfo.Arguments = strIniFilePath;
process.Start();
}
}
else
{
// No Active Sync - throw a message
}
}


Now you need to add an .ini file

Create a text file in notepad save it as setup.ini and put the next code:


[ceAppManager]
Version = 1.0
Component = SampleApp

[SampleApp]
Description = Sample Application
Uninstall = Pocket App
CabFiles = YourCab.cab


IV. CREATE A WINDOWS INSTALLER SETUP APPLICATION

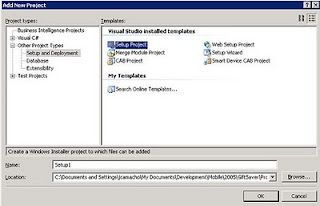
  1. On the File menu, point to Add, and then click New Project. In the Project Types tree structure, expand the Other Project Types node. In the Templates pane, click Setup Project. Name the project MyAppSetup.
  2. Right-click on the newly created project in Solution Explorer, point to View, and then select File System. The File System window allows you to control where files are installed on the user's computer. For this example, the files are the .cab and .ini files that the Application Manager will use to install the application on the Windows Mobile device.
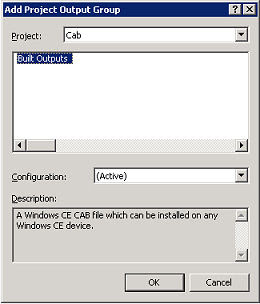
  3. To add your application's .cab file, right-click on the Application Folder icon, point to Add, and then click Project Output. In the Project list in the Add Project to Output Group window, select MyAppCab, click Built Outputs, and then click OK.
  4. To add the .ini file for your application, right-click Application Folder icon, point to Add, and then click File. Browse to your .ini file, and then click OK.
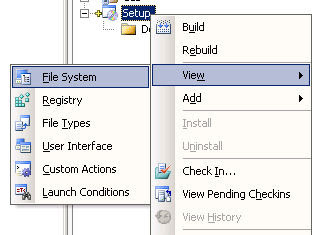
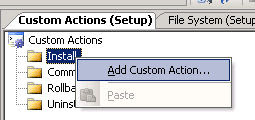
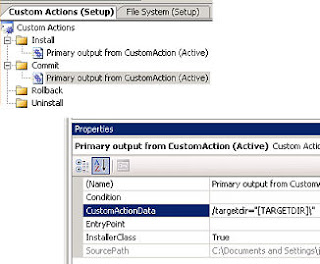
  5. Right-click the MyAppSetup project icon in Solution Explorer, point to View, and then click Custom Actions. The Custom Actions window allows you to assign custom actions to be executed for different events in the installation.
  6. In the Custom Actions window, right-click the Install icon, and then click Add Custom Action.
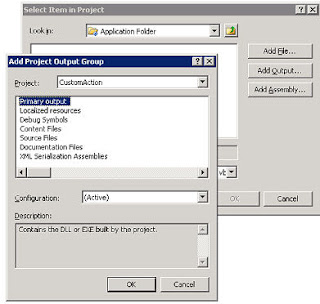
  7. In the Select Item in Project window, click on Application Folder, and then click OK. Click the Add Output button. From the Project list in the Add Project to Output Group window, click MyAppCustomAction, click Primary Output, and then click OK twice. For the commit custom action, repeat steps 6 and 7.
  8. In the Custom Actions window, click Primary Output from MyAppCustomAction in the Commit folder area. In the Properties window, enter the following value for the CustomActionData property: /targetdir="[TARGETDIR]\" this passes the directory in which the .cab and .ini files for your application are installed to the custom action.

Compile your project and execute the .exe file created!


Sources:

http://msdn.microsoft.com/en-us/library/bb158529.aspx

http://www.devx.com/wireless/Article/31198/1954

http://www.mobilepractices.com/2008/02/how-to-create-windows-mobile-smart.html

http://www.devx.com/wireless/Article/31198/1954


Monday, June 14, 2010

Unable to open outlook archive PST file


If you are unable to open your archive file from outlook, looks like it got corrupted; there is a tool that might help you fix the file.

Open up explorer and then browse down to the following folder for Outlook 2007, and run the file SCANPST.EXE:

C:\Program Files\Microsoft Office\Office12\

Once you open up the utility, you’ll have to find the location of your PST file by clicking the Browse button.

Click on the Start button to start the scan…


It will take a while to scan the file, and you’ll get a report at the end telling you whether you have errors in the file. See the image below:


Click on the Repair button, and after a while you’ll finally get the “Repair complete” message.

A log file was created, open it in order to know what was fixed on the file.

At this moment you can try to remap the file in outlook.


Source: http://www.howtogeek.com/howto/microsoft-office/fix-your-broken-outlook-personal-folders-pst-file/

Friday, June 4, 2010

ItemDataBound the last opportunity to access the data item

The ItemDataBound event is raised after an item is data bound to the DataGrid control. This event gives you with the last opportunity to access the data item before it appears on the client. After this event is raised, the data item is null and is no longer available.


For each item that is data bound, you must check the ItemType property. If ItemType is of type Item or AlternatingItem, you receive the value from the last cell of the item, which contains the SaleAmount value. In this sample, you add this value to the running summary variable. When the ItemType is Footer, you receive the total from all of the rows. Therefore, you assign the value of the summary variable to the text value of the last cell.


Code behind:


protected void dg_ItemDataBound(object sender, DataGridItemEventArgs e)
{
// Use the ItemDataBound event to customize the DataGrid control.
// The ItemDataBound event allows you to access the data before
// the item is displayed in the control. In this example, the
// ItemDataBound event is used to format the items in the
// CurrencyColumn in currency format.
if((e.Item.ItemType == ListItemType.Item) ||
(e.Item.ItemType == ListItemType.AlternatingItem))
{

// Retrieve the text of the CurrencyColumn from the DataGridItem
// and convert the value to a Double.
Double Price = Convert.ToDouble(e.Item.Cells[2].Text);

// Format the value as currency and redisplay it in the DataGrid.
e.Item.Cells[2].Text = Price.ToString("c");

DropDownList dd = (DropDownList)e.Item.FindControl("dd_control");
Label lb = (Label)e.Item.FindControl("lb_control");

// Do somenting here...
}
else
{
// It is a header or footer
// Do something here......
}

}


Source: http://support.microsoft.com/kb/313154