Monday, February 22, 2010

How to create domains in a local machine


For a developer it is really important to test applications with different domains on the local computer, this is a simple way to create all the domains you need in your local machine:

1.- Open the hosts file

Look for the fine named hosts usually on the folder:
C:\WINDOWS\system32\drivers\etc\
open it with word pad

2.- Add your domain

Below the local host add your domain, for example 127.0.0.1 test.domain.com
Save the file
3. Test your local domain

Open a web browser and type the domain you just added, the web site should display the page.


Friday, February 19, 2010

How to install SSL Certificates with Exchange 2007


Create the Certificate Signing Request

We need to create the Csr file (Certificate Signing Request), this file is a block of encrypted text that is generated on the server that the certificate will be used on.

Open the Exchange Management Shell
  1. Click on the Start menu
  2. Go to All Programs
  3. Select Microsoft Exchange Server 2007
  4. Click on Exchange Management Shell.


Run the New-ExchangeCertificate command

Below is showed an example, you can replace the appropriate values with your own information:

New-ExchangeCertificate -domainname mail.mycompany.com, mycompany.com, mymailerver -Friendlyname mycompany.com -generaterequest:$true -keysize 2048 -path c:\certrequest.txt -privatekeyexportable:$true -subjectname "c=US, o=My Company Inc., cn=mail.mycompany.com, s=Texas, l=San Antonio, ou=Information Technology"

The parameters used are:
-domainname = all the names you are going to need
-Friendlyname = easy name to remember
-keysize = Could be 1024 or 2048
-path = where you want to store the generated file
(cn=) = Common name is the most used name of your server
(o=) = Organization
(ou=) = Division of the organization
(l=) = City
(s=) = State
(c=) = Country

You can use a tool to generate the command, like the one from DigiCert

Order the certificate

Now that the CSR was generated, look for it in the path you specified on the command; this is the file you need to give when ordering it from a certificate authority (VerySing, DigiCert, AAA, etc).

Below there is a great video tutorial from DigiCert:


Install the Certificate

Open the Exchange Management Shell
  1. Click on the Start menu
  2. Go to All Programs
  3. Select Microsoft Exchange Server 2007
  4. Click on Exchange Management Shell.


Run the Import-ExchangeCertificate command

-- .p7b Certificate --
In the example below you can see how to run this command:
Import-ExchangeCertificate -path c:\mycompany.p7b | Enable-ExchangeCertificate -Services "IMAP, POP, UM, IIS, SMTP"

You can replace the parameters with your own, be sure you specified the right path were your certificated issued by the certificate authority was saved.

In the video below you can see the whole process:


-- .CRT (Root, Intermediate and Comodo Unified Communication Certificates) --

If you have received a certificate with the extension .p7b congratulations! you are done; but if instead you got three certificates you need to do couple more extra steps, do not panic this is really easy.

Install the Comodo Unified Communication certificate by running this command on the Excahnge command window:
Import-ExchangeCertificate -path c:\ASD2345.crt | Enable-ExchangeCertificate -Services "IMAP, POP, UM, IIS, SMTP"

Double click the Root certificate
Click "Install Certificate"
Click "Next"
Select "Place the certificate in the following store"
Click "Browse"
Select "Trusted Root Certification Authorities"
Right click, select All Tasks >> Import

Double click the Intermediate certificate
Click "Install Certificate"
Click "Next"
Select "Place the certificate in the following store"
Click "Browse"
Select "Intermediate Certification Authorities"
Right click, select All Tasks >> Import


Errors

If you are getting some errors try the next options.

To verify you installed correctly the certificate run the command:
Get-ExchangeCertificate | FL


Verify all the services are correct if one missing add it with the command (using ISS as example):
Enable-ExchangeCertificate -Thumbprint 29384329849482 -Service IIS

Sometimes you need to restart the services, and the last option is reboot the server.


Tuesday, February 16, 2010

How to show HTML tags in my post


There is a great web site where you can paste your code and is going to convert it into characters ready to added to your post, see the example below:

<font color=red>This is inside HTML tag</font>

The URL is:


Another way to do it is by putting the tags inside of the tag CODE


Error when compiling: The type 'xxxx.xx' is ambiguous: it could come from...


If you are getting the next error:
Error 2
The type 'xxxxxx.xxxxx' is ambiguous: it could come from assembly 'c:\WINDOWS\Microsoft.NET\Framework\ v2.0.50727\Temporary ASP.NET Files\MyAPP\5a8a9753\38142b3b\App_SubCode_XXXX.dxin6yoo.DLL' or from assembly 'c:\WINDOWS\Microsoft.NET\Framework\v2.0.50727\Temporary ASP.NET Files\MyAPP\5a8a9753\38142b3b\App_Code.9tr7twyo.DLL'. Please specify the assembly explicitly in the type name.

This problem is because you are trying to move from on version to another of .NET, or you have projects with compilation issues.

You can try the next options to solve the problem:
  1. Delete the files inside of the \bin directory
  2. Delete the files inside of the Temporary ASP.NET Files in the next path: C:\WINDOWS\Microsoft.NET\Framework\v2.0.50727\Temporary ASP.NET Files\MyApplication
  3. Be sure you have the next tags on your config file:
<runtime>
<assemblyBinding xmlns="urn:schemas-microsoft-com:asm.v1">
<dependentAssembly>
<assemblyIdentity name="System.Web.Extensions" publicKeyToken="31bf3856ad364e35"/>
<bindingRedirect oldVersion="1.0.0.0-1.1.0.0" newVersion="3.5.0.0"/>
</dependentAssembly>

<dependentAssembly>
<assemblyIdentity name="System.Web.Extensions.Design" publicKeyToken="31bf3856ad364e35"/>
<bindingRedirect oldVersion="1.0.0.0-1.1.0.0" newVersion="3.5.0.0"/>
</dependentAssembly>
</assemblyBinding>
</runtime>


Friday, February 12, 2010

Remote desktop - VNC for dynamic DNS (without static IP)

On this article you are going to see the steps needed to access you machine remotely without paying extra money for static ip and domain.


1.- Set IP

Got to Start >> Select Run >> Type: command >> click OK.
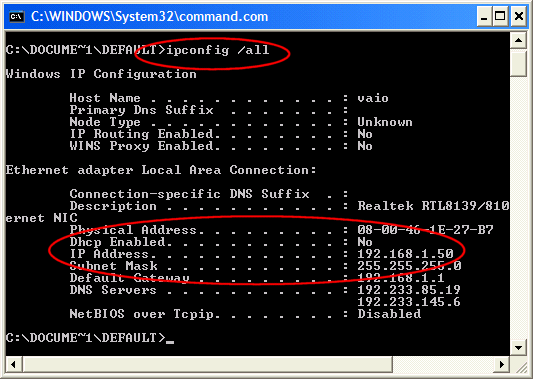
Type: ipconfig /all >> press Enter.
Look for these values:
- Dhcp Enabled
- IP Address (This is your current IP address)


Leave this window open to use the values later.


Open Control Panel >> Open Network Connections
Category view: Select Network and Internet Connections >> Network Connections.
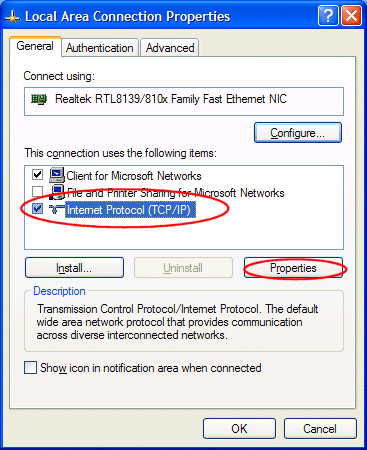
Double-click on your active LAN or Internet connection >> Properties.
In the General tab, select the Internet Protocol (TCP/IP) item >> click Properties.


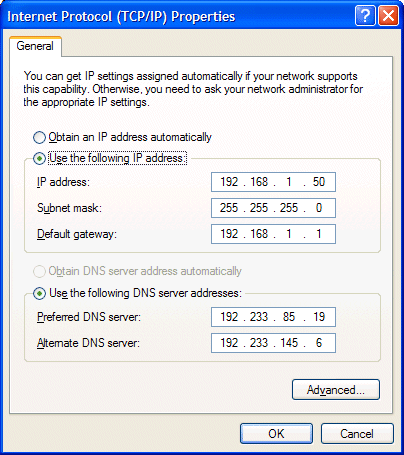
In the General tab, click Use the following IP address, and enter:
- IP address. The static IP address you want to assign to this computer.
- Subnet mask. Subnet mask used by your router.
- Default gateway. IP address of your router's default gateway.


Click OK to close each window >>
Restart your computer (if needed)
Now your computer is going to use always the internal static IP (in this example 192.168.1.50)

Source: http://www.hotcomm.com/faq/FAQ_staticIPXP.asp

2.- Create a DNS account


From the computer that you want to connect to remotely, click on this link to create a new account.
Enter your email address and password >> click the Create Account button.
Once you activate the account, login to the website and follow these steps.
Account >> My Services >> Add Host Services >> Dynamic DNS
Click on Add a New Host
Enter a hostname, it can be anything like “MyHomePc”. Hit Add Host.

Source: http://technopedia.info/tech/2006/05/09/remote-desktop-for-dummies.html


3.- Enable remote desktop

Right click on My Computer
Select Properties >> click on the Remote tab
Check the box that says Allow users to connect remotely to this computer.


Now set up the firewall
Go to Control panel >> Windows Firewall
Click on Exceptions >> Click Add Program
Select Remote desktop >> Click Ok

4.- Setup router

Look for your router in the next web site http://portforward.com this example is for Netgear WGR614v6.

Open a web browser, enter the ip address of your router in the address bar of your browser. By default the ip address should be set to 192.168.1.1.


Click the Port Forwarding / Port Triggering link near the left of the page.


Put a dot into the Port Forwarding radio button. Click the Add Custom Service button.


We will list a series of lines here that will show you exactly how to forward the ports you need to forward. Remote Desktop requires you to forward the 3389 ports. Go ahead and enter the settings shown above into the Custom Services menu and then click Apply.

Source: http://portforward.com

Now you are ready to access your machine remotely without spending extra money!

Monday, February 8, 2010

SQL 2005 Transaction log full


If you get the error message:

Error: 9002, Severity: 17, State: 2
The transaction log for database '%.*ls' is full. To find out why space in the log cannot be reused, see the log_reuse_wait_desc column in sys.databases

These are some of the reasons that caused this problem:
  • A very large transaction log file.
  • Transactions may fail and may start to roll back.
  • Transactions may take a long time to complete.
  • Performance issues may occur.
  • Blocking may occur.

But bottom line is that is time to do something with the Transaction Log. Something you can do is start a clean transaction log (Be sure you have a backup to be save).

  1. Select your database, right click on it, go to Tasks >> Take Offline, we need this step in order to be sure nobody is using the data base.
  2. Now highlight the database, go to Tasks>>Detach.>> Click OK
  3. Go to the folder where the log file is located, then rename  the *_log.ldf to be like *_log-jj.ldf
  4. Now it is time to retach the database, go to Databases and right click >> Attach…>> Click Add >> add the database you detached
  5. Select the log file and click the ‘Remove’ button so you only attach *.mdf file
  6. At this moment a new transaction log file is created and you can delete the old one.


Friday, February 5, 2010

How to enable CLR on SQL Server 2005


You need to enable the Common Language Run-time (CLR) on SQL Server 2005 in order to run .net functions; but default this feature is not enabled for security. If you try to run a CLR function you will get the next error message:
Msg 6263, Level 16, State 1, Line 1
Execution of user code in the .NET Framework is disabled. Enable "clr enabled" configuration option.
To fix this problem run the next code using SQL Managment Studio:
sp_configure 'clr enabled'
go
reconfigure
go
You will get the next message to indicate you can run CLR functions:
Configuration option 'clr enabled' changed from 0 to 1. Run the RECONFIGURE statement to install.


Another way to enable the CLR is:
1. Explore SQL Server 2005//Configuration Tools//SQL Server Surface Area Configuration
2. Select "Surface Area Configuration for Features"
3. Click on CLR Integration
4. Check the "Enable CLR Integration" Checkbox


SQLwb.exe is using the CPU 100%

What is the SQLwb.exe?
It is a Console Executable from Microsoft belonging to SQL Server anagement Studio.


Problem:
This program is using the 100% of my CPU!

Possible reasons:
You don't have enough space on your hard drive
There is a problem on the registry


SQL Server CE Versions

There are several versions of SQL Server CE, these versions sometimes drive us crazy when deploying mobile applications because the database works on only some devices. This is a brief description and compatibility of SQL Server CE.

Basically there are 5 major versions

Offical NameAlias
SQL Server 2000 Windows CE EditionSQL CE 1.1
SQL Server 2000 Windows CE EditionSQL CE 2.0
SQL Server 2005 Mobile EditionSQL CE 3.0
SQL Server 2005 Compact Edition*SQL CE 3.1
SQL Server Compact 3.5SQL CE 3.5

* Known also as SQL Server 2005 Everywhere Edition.

All these versions have 3 different and incompatible file formats.
Versions 1.0, 1.1 and 2.0 have the same format.
Versions 3.0 and 3.1 have the same format.
Version 3.5 has another format.

See the table below:

Version

Product Official Name(s)

Product Codename

Nickname

Client 2.0

SQL Server 2000 for Windows CE

SQL Server Compact 2.0

SQL CE 2.0

Client 3.0

SQL Server 2005 Mobile Edition

SQL Server Compact 3.0

SQL CE 3.0

Client 3.1

SQL Server 2005 Compact Edition

SQL Server Compact 3.1

SQL CE 3.1

Client 3.5

SQL Server Compact 3.5

SQL CE 3.5

Server 8.0

SQL Server 2000

Shiloh

SQL Server 8.0

Server 9.0

SQL Server 2005

Yukon

SQL Server 9.0

Server 10.0

SQL Server 2008

Katmai

SQL Server 10.0

Summary:


1) SQL Server Compact 3.5 can synchronize with only SQL Server 2005 not with SQL Server 2000.

2) SQL Server Compact 3.5 Server Tools package enables synchronization between SQL Server Compact client versions 3.0, 3.1, and 3.5 and SQL Server 2005 through SQL Server Compact3.5 IIS components.
3) SQL Server Compact 3.5 SP1 can synchronize with both SQL Server 2005 and SQL Server 2008.
4) SQL Server Compact 3.5 SP1 Server Tools package enables synchronization between SQL Server Compact client versions 3.0, 3.1, 3.5 and SQL Server 2008 through SQL Server Compact 3.5 SP1 IIS components.


Missing item templates in Visual Studio 2005

If you try to add an item (Class, Form, etc.) and you notice there is one or more templates missing, sounds like something went wrong with the cache on disk of all the installed item templates.

Here you have two possibles ways to solve the problem:


First option
Close Visual Studio then Open the ‘Visual Studio 2005 Command Prompt’.
Type the following command at the prompt, press enter and wait a couple minutes.
devenv /installvstemplates

Second option
Open the Options window in Visual Studio.
Select Projects and Solutions.
Change the Visual Studio user item template location to the folder where the standard templates are located:
C:\Program Files\Microsoft Visual Studio 8\Common7\IDE\ItemTemplates


Programmatically hide a file with C#

If you want to hide a file or folder, you need to use the System.IO.FileAttributes library, see the example below:

string filePath = @"C:\MyFile.txt";
System.IO.FileInfo f = new System.IO.FileInfo(filePath);
f.Attributes = System.IO.FileAttributes.Hidden;
Console.WriteLine("You can not see the file!");

You can do a lot more things with the library System.IO.File, like copy, move, etc.
This example also works with the .Net Compact Framework